Thursday, January 28, 2016

Install latest Ubuntu version under VirtualBox and set up ssh

Here is how to install Ubuntu in a virtual machine "Virtual Box" and set up an ssh server. Reference: Practical Ubuntu Linux Server for beginners
First install the free version of Virtual Box from Oracle website: https://www.virtualbox.org/ . Then open the program and let's create a new virtual machine from the button new.
Note: Ubuntu requires around 10GB of disk space and please make sure that all visualization instructions and software code protections are enabled within your BIOS.
Then we download the latest Ubuntu version from http://cdimage.ubuntu.com/daily-live/current
Now is time to start the virtual machine and open up the Ubuntu .iso file. The installation will start, where is important to choose the root partition mount point/.
Here is how to do the installation:


After finishing installation it is time to install the networking, but first please update the system by opening a terminal (Ctrl+t):
# sudo apt update
# sudo apt dist-upgrade
If you wish to install ssh server and use it within your network, this can be done the following way: To install an ssh-server in a terminal type:
# sudo apt install ssh-server
Then we have to remove the built-in network manager(which will mess with the static IP addressing we need to set) via:
# sudo apt purge network-manager
At this point you may notice that other virtual boxes could not contact your machine, this is because you have to set the virtual box networking model. So open VirtualBox Ubuntu image settings and set the virtual machine networking from NAT to BRIDGED, which means that it can use private addresses and set up servers on. Warning this will stop your internet access. Then restart the ubuntu virtual machine and is time to set up our network so type:
# sudo ifconfig eth0 192.168.0.1 netmask 255.255.255.0 up
this will set up your network interface card. If you want to make the changes persistent on the next restart you can place this information in /etc/network/interfaces file:
# sudo nano /etc/network/interfaces
iface eth0 inet static
address 192.168.0.1
netmask 255.255.255.0
gateway 192.168.0.255

next you can do the same steps for other virtual installations of Ubuntu.
and try to connect to 192.168.0.1 via ssh client
# ssh 192.168.0.1 -l username

That's it. Enjoy learning !

Monday, January 25, 2016

Install Wordpress in Ubuntu

This post will show how to install WordPress blog under Ubuntu I've prepared a video describing the process, and you might be interested in following a whole course.


We'll be using the default blog directory of /usr/share/nginx/html, so if you have a different one like /var/www/html please use it instead.
The first step is to get the WordPress system from wordpress.org
in a terminal type:
cd /tmp
wget http://wordpress.org/latest.tar.gz
then we unpack the archive
tar -zxvf latest.tar.gz
and move to our blog directory
mv wordpress/ /usr/share/nginx/html/
next, we change the group and owner of this directory to www-data, which is needed by our web-server to have access to the files:
chown -R www-data:www-data /usr/share/nginx/html/wordpress
then give permissions for all users in this owner to read, write and execute(7) files in the blog directory, and for the group and other users just to be able to read and execute files(5):
chmod -R 755 /usr/share/nginx/html/wordpress
we set the same rules to be automatically applied for any sub-directory to be created within /wordpress/, to serve image or other uploads, plugins etc.
sudo chmod g+s /usr/share/nginx/html/wordpress
Then we launch mysql client
mysql -u root
and lets create the default wordpress database:
CREATE DATABASE wordpress;
create one user wp_user in order to have access to our wordpress database:
CREATE USER wp_user IDENTIFIED BY 'wp_pass';

and give permissions to wp_user to be able to create tables, insert data etc. inside the wordpress database:
GRANT ALL PRIVILEGES ON wordpress.* TO wp_user;
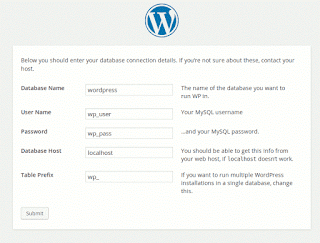
now is time to set up the default configuration of our blog to use this database so we go to our blog directory, rename and use the default config file:
mv wp-config-sample.php wp-config.php
then open it up for editing via:
sudo nano wp-config.php
just change these three to ensure that WordPress will have access to MySQL:
define('DB_NAME', 'wordpress');
set database user name:
define('DB_USER', 'wp_user');
set database password
define('DB_PASSWORD', 'wp_pass');
finally, open up a browser and type:
http://localhost/wordpress/index.php


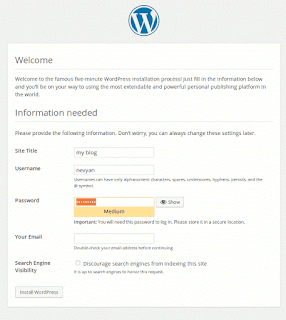
then follow the steps and your WordPress installation is ready!

Install & setup NGINX, PHP, MYSQL and FTP in Ubuntu 19.04

This post will describe how to install how to set up a brand new website hosting using the following software technologies: webserver: Nginx, language: PHP, database: MySQL, and set up ssh secure shell and FTP access under Linux Ubuntu 19.04.
Knowing how to install these services is essential when developing web applications, it is also very useful while taking comprehensive course projects, which prefer local installations. 
 

Please take a look at the video:


We start with installing the ssh server so in the console ( terminal ) start typing the following commands:
sudo apt install openssh-server
then we start the server:
sudo systemctl start sshd
from now on we can access our server via: ssh 192.168.100.1 -l myuser just replace your IP address and the user parameters

NGINX
install the Nginx server
sudo apt-get install nginx
edit the sites directive and ...
sudo nano /etc/nginx/sites-available/default
and place the following information, replacing the server_name IP address with your own(check it with the 'ifconfig' command) and if you wish the root directory of the server:
 
 server {
    listen 80 default_server;
    listen [::]:80 default_server ipv6only=on;

    root /usr/share/nginx/html;
    index index.php index.html index.htm;

    server_name 192.168.100.1;

    location / {
        try_files $uri $uri/ =404;
    }

    error_page 404 /404.html;
    error_page 500 502 503 504 /50x.html;
    location = /50x.html {
        root /usr/share/nginx/html;
    }

    location ~ \.php$ {
        try_files $uri =404;
        fastcgi_split_path_info ^(.+\.php)(/.+)$;
        fastcgi_pass unix:/var/run/php7.2-fpm.sock;
        fastcgi_index index.php;
        fastcgi_param SCRIPT_FILENAME $document_root$fastcgi_script_name;
        include fastcgi_params;
    }
}

write out with ctrl+o and exit.

open the Nginx configuration file
sudo nano /etc/nginx/nginx.conf
and make sure that the user www-data; is present!
restart Nginx to apply the settings
sudo systemctl restart nginx
then if you type: http://your_ip_address/ the webserver should give you a webpage!

MYSQL

install the MySQL server
sudo apt install mysql-server
automatically set up default permissions for databases, remove users and restrict access
sudo mysql_secure_installation

change ownership of MySQL directory in order to have database access from the MySQL client / or API interface running on PHP applications
sudo chown mysql:mysql mysql/ -R
change connection of MySQL from a socket to password authentication:
sudo mysql
ALTER USER 'root'@'localhost' IDENTIFIED WITH mysql_native_password BY 'password';
next, apply the changes with:
FLUSH PRIVILEGES;
EXIT
optional: add DB permissions in order for the MySQL interface used by PHP to access the databases and tables
open up MySQL. When asked for password type "password"
mysql -u root -p
give privileges: replace your_database with the DB you want to access from within PHP and your_user with a chosen user, you want to give privileges on:
GRANT ALL PRIVILEGES ON your_database.* TO 'your_user'@'%' WITH GRANT OPTION;

FTP SERVER
install FTP server vsftpd
sudo apt install vsftpd
edit the vsftpd configuration file:
sudo nano /etc/vsftpd.conf
make sure that these are uncommented (without ; in front of the line)
enable local_enable = YES;
write_enable = YES;
local_umask = 022;
and add
local_root=/usr/share/nginx/html
to be able when connecting with FTP client to jump straight to the website directory.

Note:
use only one of these, the other option should be set to NO:
for IPv4: listen=YES
for IPv6: listen_ipv6=YES

restart vsftpd to apply the new changes
sudo systemctl restart vsftpd

PHP
install php language
sudo apt install php-fpm php-mysql
edit php config files:
sudo nano /etc/php7.3/fpm/php-fpm.conf

make sure that
user = www-data
group = www-data
are set in: sudo nano /etc/php7.3/fpm/pool.d/www.conf

in the following file you can set up error logging:
sudo nano /etc/php7.3/fpm/php.ini
error_reporting = E_ALL & ~E_DEPRECATED & ~E_STRICT
restart the PHP service to accept the changes:
sudo systemctl restart php-fpm

PHPMYADMIN
install PHPMyAdmin
sudo apt install phpmyadmin
(& create PHPMyAdmin with user and password of your choice)

create a symbolic link from the default HTML directory of Nginx to PHPMyAdmin so it can be browsed via http://your_host/phpmyadmin (where your_host could be 127.0.0.1 or you IP address)
sudo ln -s /usr/share/phpmyadmin /usr/share/nginx/html

change ownership of default Nginx directory to be created and owned by www-data
sudo chown www-data:www-data /usr/share/nginx/html/ -R
give permissions of any owner and member of this www-data group to read and write files in the default website directory (for FTP and console access) 
sudo chmod -R 775 /usr/share/nginx/html/

set sticky bit for anyone who is a member of the group www-data to create new files and directories with default read write and execute permissions.
sudo chmod g+rwxs /usr/share/nginx/html
add our user $USER to be a member of the www-data group, which is the default group of Nginx server (to enable writing into files)
add our user $USER to the www-data group
sudo usermod -a -G www-data $USER
note: you'll have to re-login in the server to see the effect of creating new files and directories or the alternative is to type: newgrp www-data and test the changes!

That's it, enjoy and happy coding. And if you want to learn more on Ubuntu administration you can try this course

Monday, September 09, 2013

Remove duplicates from country specific Blogger urls

Here is how to clean up your blog from possible duplicates coming from country-specific Blogger URLs. First off what are these URLs and how are they produced. For example, if your original blog URL is: nevyan.blogspot.com. and you happen to visit the website from India you'll be served with the exact same content, but this time coming from domain .in like nevyan.blogspot.in
That if left unchanged will surely create duplicate content in Google's index - because you're having 2 domains that serve exactly the same content. So here is how to check and fix your blog, avoiding such duplication issues.

0. Fix your canonical tags, and don't rely on fancy JavaScript redirects, which are not properly followed by search engines and lead to 2nd refresh of the webpage.
Just open up your blogger template and place in the section:
<link expr:href="data:blog.canonicalUrl" rel="canonical">
This way the search engine will know which is the legitimate version of the accessed content.
like if google crawls nevyan.blogspot.in the canonical tag will reveal its representative URL as: nevyan.blogspot.com

1. Check if you have already indexed content from domains outside yours.
by using the following search in google:
"nevyan.blogspot" -com 
or by manually checking all the domains found here: http://dishingtech.blogspot.com/2012/06/list-of-blogger-country-domains-for.html:

2. For each domain found extract the indexed links:
site:nevyan.blogspot.name_of_domain
 site:http://nevyan.blogspot.ca will list each of the indexed results coming from root domain Canada

3. Next open Google Webmaster tools and authenticate the domains as yours from: 'Add domain', and go to Google Index -> Remove URLs

4. Type the URLs and wait for the removal process to finish.
Note: in order for the removal to be successful be sure that those URLs have either meta noindex tag or are disallowed in custom robots.txt file

Cheers!

Monday, August 26, 2013

Recovering from the Google's Penguin and Panda updates

Google Panda

As you may know, there is an ongoing algorithmic update named "Panda" or "farmer", aimed at filtering out: thin / made for Adsense / copied content from Google's search index. The algorithm mainly pushes websites down in SERPS, aiming to replace them with author-owned content websites, which could be more useful to the visitors.
The actual filter has an automatic semantic algorithm, which is triggered by various factors in order to classify content as useful. Triggering factors remain secret, but it is known that websites who serve content of mixed quality (both bad and good) to their visitors will have their SEO rankings impaired.


The algorithm uses additional information from:
- google chrome browser addon, allowing the user to block non-quality sites
- blocking site features provided in google search
- social sharing: not the actual number of likes, but the links that a website gets as a result of facebook share or retweet.

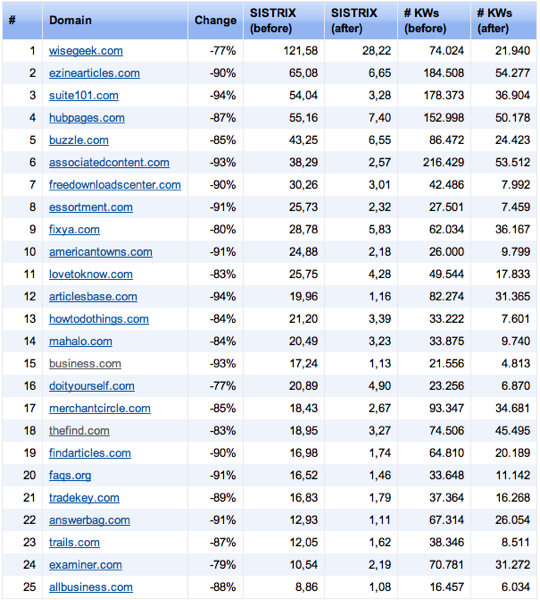
Here is a sample table showing traffic decline after the Panda update has been applied to popular affected websites, which is somewhere between 70-90%. (note that the company providing the results is measuring a particular set of words, and not the whole long tail traffic of the mentioned websites)


Another triggering factor of the update is the lack of user satisfaction measured with the amount of time spent on one page before the user clicks on the back button returning to search results in order to find another website.

Here is what you can do in order to get your website less affected from the update:

1. Use noindex meta tag on thin or of low-quality content. Example: 2nd level category pages, containing only links with no actual content.
2. Delete all the copied content and make the pages return header status 404 not-found.
3. Reduce the number of adverts or additional page elements, appearing before the actual content. (above the fold), or make sure that they're blending within the content:
Site layouts that highlight contentSite layout that pushes content below the fold

4. Use google analytics to find webpages, with the lowest time on-page, and use the same methods as 1) to restrict them.
5. By default use meta noindex to all new pages until they have quality content.
6. Don't use white text on a black background.
7. Ensure maximum user time to be spent on a page.

Next, follow tips on website recovery from Penguin / Panda update. They are not well known to the general audience that's why I decided to share them here.


Redirects
Check with curl command if all your website resources respond with 200 OK, and are not using 301 or 302 redirects. The reason is that curl shows different/real/not cached header status codes than the default's browser/firebug.
Usage from a command prompt: curl -IL http://your_website.com
Next do check your main page, category pages, inner content pages, JavaScript and CSS files. Just make sure that they return 200 OK response.
The same procedure can be done using the Screaming Frog SEO spider.

DNS
Check the latest propagated DNS settings of your website. Most of the DNS checking websites, as well as nslookup command, provide cached DNS name server responses, even if you clear (flush) your system cache. That's why I recommend checking your website name servers using http://dns.squish.net/ website. Also make sure that the IP address of your DNS server (its A record), matches the NS entry of your domain server. After making sure that there are no problems go to google webmaster tools and fetch your URL via fetch as google.

Removing duplicate content
When doing URL removals in webmaster tools, make sure that you type the URL manually from the keyboard or if it is too long to use the dev tools console to explore the URL and copy and paste it directly into the input box. If you just select & copy the URL with the mouse from the search results, there's a high chance for some invisible characters to be added next to it like %20%80%B3, etc. This will make your request legitimate, but don't be surprised if you see the already removed URL reappearing in the index. For this reason, a few days after the removal you should re-check google's index to see if there are any occurrences of the URL still present. Some not so obvious URLs to be indexed are your .js, .swf or .css files.
In order to effectively remove content, it should either return 404-not found result, or 1) has noindex, nofollow meta attribute and 2) is not present in the robots.txt file.
Also if you have access to .htaccess file here is how to add canonical tags to .swf or .json files:
Header set Link: '<http: canonical_file.swf="" domain.com="">; rel="canonical"'</http:>
This way any existing link power will accumulate over the canonical url.

Robots.txt, noindex, nofollow meta tags
In order to reveal indexed but hidden from google SERPS content, you should release everything from your robots.txt file (just leave it empty), and stop all .htaccess redirects that you have.
This way you will reveal hidden parts of the website (like indexed 301 redirect pages), which are in the index, and will be able to clear them up.
The other reason behind this change is that, if you have URLs in robots.txt they won't be crawled and their link rank recalculated as you like, even if those are being marked with the meta tag noindex, nofollow. After the cleaning procedure, don't forget to restore the contents of your robots.txt file.

Google Penguin

This update previously known as anti-spam or over-optimization, now is more dynamic and is being recalculated much more often. If you are not sure which exactly Google quality update affected your website it's very hard and slow to make random changes and wait for feedback i.e. traffic increase. So here I'm suggesting one convenient logical method on how to find out:
First, get your site visit logs from Google Analytics or any other statistical software. We are interested in the number of total unique visitors. Then open this document: http://moz.com/google-algorithm-change. Next, check whether on the mentioned dates or few days after starting from February 23, 2011 you have a slight drop in traffic. If true your pages have been hit and it's time to take measures against this specific update. But first let's make sure that your content conforms with the following techniques, which are recommended in forums, articles, video tutorials and in non-free SEO materials.

Over-optimization:
- keyword density above 5%, stuffed bold/emphasized(em) keywords in meta keywords, description, title as well as h1...h6, img title and alt attributes
- leaving intact the link to the blog theme author/powered by
- adding links with keywords variations in the anchor text on the left, top or bottom section of the website (which in reality receive almost no clicks)
- creating multiple low quality pages targeting same keywords, thus trying to be perceived as authority on the subject
- creating duplicate content by using multiple redirects that (301, 302, JavaScript, .htaccess etc...)
- overcrowding the real content with ads so that it appears way low behind the page flow, thus requiring lots of scrolling activity to be viewed
- using keywords in: page url and in domain name

Link schemes:
- being a member of web-ring networks or modern link exchanges. Some sophisticated networks have complicated algorithms which choose and point proper links to your newly created content thus making it appear as solid
- having low perceived value / without branding or gained trust during the years, but receiving (purchased) multiple links from better ranking websites
 - Penguin 1 was targeting sites having unnatural / paid links analyzing only the main page of a particular website. With the time 'clever' SEOs started buying links not only pointing to the main, but to inner pages or categories - leading to Penguin 2 where such inner pages, having spammy link profiles have been taken into account.
- more and more people are using their comments to sneak in their links. The old/new spamming technique goes like this: they say something half meaningful about your content or something that sounds like a praise and then put their website link in the middle of that sentence. Please don't approve such comments and report them as SPAM.

Solutions:
- rewrite or consolidate the questionable content with few other posts
- delete the low quality page if it already has a 'not so clean' backlink profile and the back-linking site doesn't want to remove its links
-use Google Disavow tool to clean up website's back-linking profile

Don't forget that like every Panda update Google makes its changes continuously using multiple tests and corrections over the algorithms. So some fluctuations while examining the SERPS are possible to be observed.

Good luck!

Subscribe To My Channel for updates